Remington Model 8 and 81: Browning’s Long Recoil Sporting Rifles
A practical, collector-minded look at Remington’s Model 8 and 81. Calibers, long recoil explained, police conversions, and what to check before you buy.
Call us any time at: (833) 486-6659
I learned about chokes the hard way, standing in flooded timber with a very proud old goose gun that wore a fixed Full. The teal that morning did what teal do. They jinked, cut low, and then were close enough to read band numbers before they lit. The first bird I hit looked like a fistful of feathers exploded in midair. The next two slipped through an open doughnut in the pattern and kept flying. Back at the truck, the gun looked the same as it had for decades, but the truth was already written on the paper I hadn’t shot yet: my setup wasn’t matching my range.
The clearest way to picture a choke is the hose-nozzle comparison. Twist a nozzle tighter, and the stream stays together longer. Open it up, and the spray fans out sooner. A choke does the same thing to your payload of shot in the last inches of barrel, squeezing the column as it reaches the muzzle so the pellets hold together a little longer downrange. The shot cloud keeps expanding and stretching as it flies, more or less a cone that grows with distance. The choke simply helps you time that expansion for where you expect to shoot. That’s the whole game.
Two quick truths live inside that sentence:
Too tight and you miss around the edges or tear up birds at short range. Too open and you pepper a wing or chip a clay without enough pellets to finish the job. Those tradeoffs never go away; they just move as you change chokes and shells.
Choke is a measurement, not a mood. It’s the tiny difference between the bore diameter and the muzzle diameter in thousandths of an inch. As a simple reference set, these common names are often associated with approximate constriction values:
Older guns may have these constrictions permanently cut into the barrel. Most modern shotguns use interchangeable screw-in tubes so one gun can handle everything from skeet to geese. Keep in mind that choke names are guidelines. The only way to know what your gun and load are actually doing is to shoot paper.
This is where people get tripped. Two identical shotguns, both wearing tubes marked Modified, can throw patterns that look like cousins at best. Why?
As a general trend, faster loads and smaller shot tend to open patterns more quickly, while slower loads and larger pellets often pattern a bit tighter. But these are tendencies, not promises. Some modern wad designs keep small pellets flying in a tight swarm. Others are made to separate quickly. You will not settle this debate on the internet. You’ll settle it at the pattern board.
Most choke tubes rely on constriction. Some, though, change how the wad and shot part company. “Wad-stripper” designs use internal studs or features to slow the wad and let the pellets fly on without being shoved by plastic for too long. Although they look different from a tapered constriction, the goal is the same: manage how the wad slows and how the shot column holds together. Conventional constriction slows the wad as it squeezes through. Wad strippers slow it down by design features inside the tube. The result in both cases is a pattern tuned for the job.
There’s a caution here if you shoot hard, non-deforming pellets. Very tight chokes with a hard shot can be a rough pairing. Beyond some point, you risk damage to the choke or the barrel. If you’re chasing the last few pellets into a turkey head at long range with a very hard pellet material, keep the wrench handy, but also keep your expectations and your hardware in a safe zone. When in doubt, contact the choke and gun maker and test responsibly.
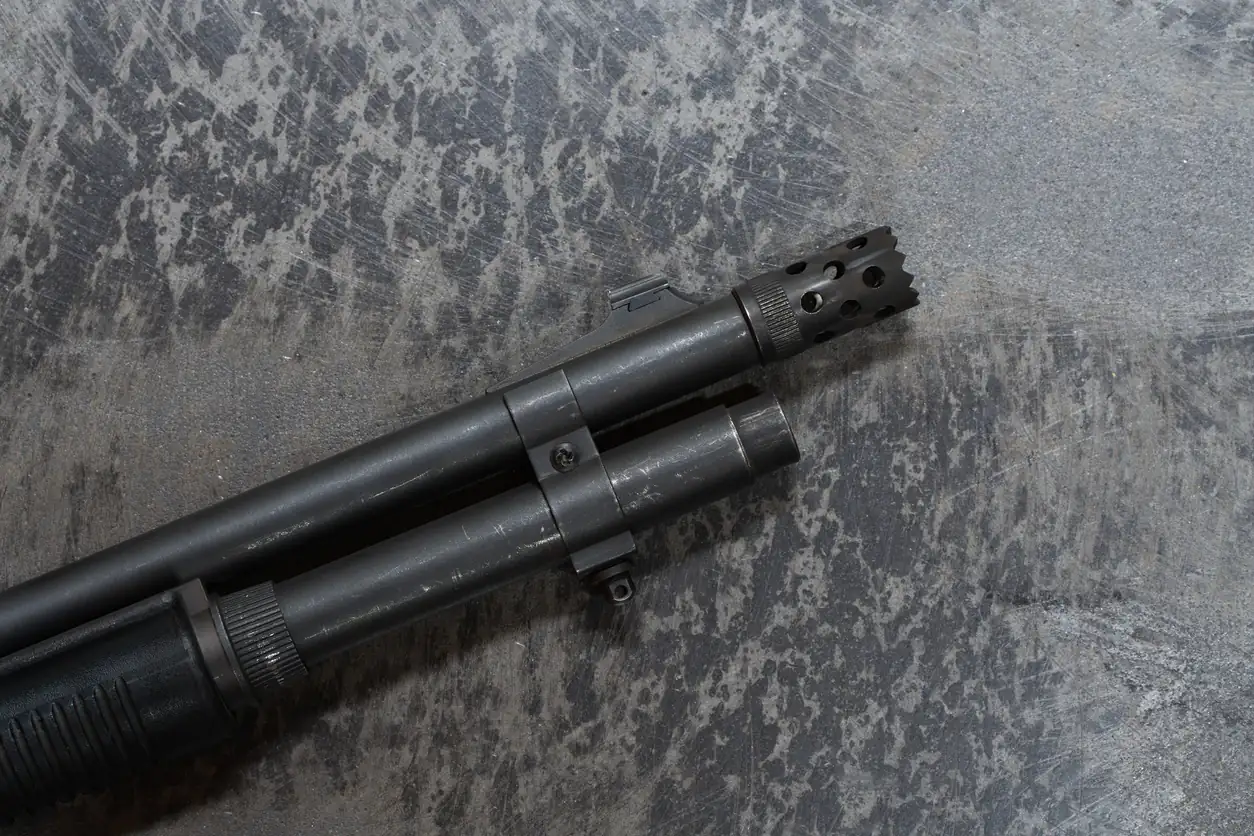
Every so often, a design tries to cheat the circle. During Vietnam, SEALs experimented with a “duckbill” spreader that pressed the pattern into a horizontal oval, aimed at putting more pellets across a man-height window near the ground. Originals had a reputation for cracking and spreading under use. Reproduction pieces exist, and when tested with buckshot at short distances they can create that wider-than-tall signature pattern. If you enjoy the odd corners of shotgun history, it’s worth watching a modern range test of a duckbill on a Remington Model 11 with #00, #1, and #4 buck at 10 yards. It’s a good reminder that pattern shape can be steered, but the laws of pellets and distance still apply.
Plenty of classics wear fixed chokes. Double guns often split the difference with two different chokes across the barrels. Many early semi-autos and pumps ran fixed chokes for years before replaceable tubes were common. If you enjoy older self-loaders, you already know how much those designs shaped what came later. For a bit of context on that lineage, I covered the long-recoil era in how long-recoil shotguns set the stage for modern semi-autos.
If your gun has a fixed choke and the muzzle isn’t marked, you can do more than guess. A bore micrometer can measure the actual bore diameter and the diameter at the muzzle. Subtract muzzle from bore. That difference is your construction. It won’t tell you the pattern on birds, but it puts you in the right neighborhood before you shoot paper.
The only way to know what you’re sending downrange is to print it. Tradition says 40 yards, and that’s still a good reference point, but you should also test at the ranges you actually shoot. If you spend your fall in timber at 20 to 30 yards, test there. If you set decoys for honkers at 35 to 45, include those distances.
Here’s a straightforward method you can run in an afternoon:
What are you looking for? A pattern that stays forgiving at your chosen distance while having enough pellets in the 30-inch circle to do real work. For waterfowl over decoys, many hunters try to land around three-quarters of the payload in that 30-inch circle at their normal distance. A lot more isn’t automatically better, because a laser-tight center leaves you with a skinny edge. A lot less, and you’re rolling dice with cripples or lost opportunities. Again, that number is your target at your distance, not a rule that erases reality. Test and see.
If you want more than a gut check, count.
Do this at the ranges that matter to you, and the results will begin to sort themselves out. You’ll notice some loads pattern surprisingly tight or loose with the same tube. You’ll see shifts in point of impact, which matter just as much as pellet count. You’ll learn that your favorite shell might need a different choke to shine.
If you want a place to start before your first paper, here are working suggestions that line up with how most folks shoot and what many instructors preach:
Full chokes can work very well with smaller shot. Just be cautious when pairing the tightest tubes with very hard pellets. You can overdo constriction and start putting stress where it doesn’t belong.
Dedicated turkey chokes often run extra-full or tighter. You’ll see constrictions in the .665 to .655 range for 12-gauge, sometimes even tighter. The idea is simple: center as many pellets as possible in a turkey head and neck window at your chosen distance. Modern tungsten-based loads and some wad designs will stack a jaw-dropping number of hits into that space. The trick is to make sure that combination also gives you a forgiving enough pattern at your closest likely shot. Over-tight at 15 yards can be unforgiving, and hard, small pellets don’t behave like old lead 6s. Start with a proven choke range and adjust based on paper.
A note on velocity and pellet size applies here too. Faster loads and very small pellets can make a choke behave tighter or looser than the label might lead you to believe. Test both near and far. A gobbler rarely reads the box before he shows up.
Buckshot deserves its own quick paragraph, because the pellets are larger and patterns can be unpredictable without testing. At short ranges, different buck sizes can behave very differently even from the same tube. There are also specialty spreaders that change the shape of the pattern, like the duckbill mentioned earlier, which was built to throw a pattern that was wider than it was tall at short distance. If you keep a shotgun for home or ranch work, take 10 to 15 minutes to shoot paper at 7 to 15 yards with your chosen load and choke. You might be surprised by how tight or how lopsided things are. That knowledge is worth more than any assumption.
I’ve made all of these, and I see them at ranges every spring and fall:
Pattern work isn’t glamorous, but it’s short and satisfying when you approach it like a little experiment. Keep it simple. Pick a choke and a load. Shoot three to five sheets at a distance you care about. Adjust one thing at a time. Within a box or two of shells, you’ll know more about your gun than a month of guesses can teach you.
That old Full-choked goose gun from the timber hunt? It still wears Full, and it still hits like a hammer beyond decoy distance. For close teal, I use a different setup with a more open tube and a load that patterns kinder at 25. Same shooter, same cheek weld, different map. You don’t need new gear so much as you need proof on paper. Modern screw-in chokes let you make those choices quickly. Older fixed-choke guns reward you for learning their habits. Either way, the target tells the truth.
If you want a clear, concise overview of choke choices and how to test them with the loads you actually shoot, this write-up from Ducks Unlimited on understanding and testing chokes lines up closely with the method above. Read it, then make an afternoon for the pattern board. Your birds and your clays will show you the difference.
Available
View Item
Available
View Item
Available
View Item
Available
View Item
Available
View Item
Available
View ItemA practical, collector-minded look at Remington’s Model 8 and 81. Calibers, long recoil explained, police conversions, and what to check before you buy.
A collector’s look at Colt’s SP1 and early Sporters, from slickside uppers and pencil barrels to the rollmarks and small changes that hinted at the A2 era.

A practical, story-driven guide to reading JM vs REP barrel marks, understanding pre-safety 336s, Micro-Groove and Ballard-style rifling, and the smart checks to make before you buy.