The first time I patterned a slick old 12 bore I was sure the problem was me. Birds flushed, I swung, and the empties piled up with very little to show for it. On paper at 35 yards, though, the truth turned up in black and white. That classic fixed Full was stacking pellets high and tight, with a ragged fringe and holes big enough to walk a quail through. I swapped to a more open barrel, marked the target again, and the bird count started to make sense. It was my wake-up call: a shotgun is only as good as the pattern it throws, and the choke is the steering wheel you actually feel on target.
If you’re shopping for a shotgun, tuning the one you have, or dusting off a classic side-by-side, here’s a clear, collector-aware guide to what chokes really do, the tug-of-war between fixed and screw-in tubes, what constriction names mean in practice, how wads and forcing cones factor in, and a step-by-step patterning plan that puts pellets where they should go.
What a Choke Really Does
A choke is the slight taper at the last bit of a shotgun barrel that gently squeezes the shot column as it exits. That squeeze shapes the pattern downrange. It does not give the pellets more energy or make them magically fly farther. Its job is to help you deliver enough shot density at the distance you actually shoot.
Think of the water hose nozzle analogy. Close it a bit and you get a narrower stream that holds together longer. Open it and the spray widens quickly for work up close. A shotgun choke behaves the same way with lead, steel, bismuth, or tungsten pellets. That concept tracks with plain-language explainers like Field & Stream’s guide to shotgun chokes, and it squares with hunting education notes that remind us that chokes shape pattern for a chosen distance, not range in itself.
Here’s the honest part many folks learn the hard way: even a good choke can’t beat physics. As distance stretches, the shot cloud widens and lengthens, and gaps open. When you shoot paper and count hits, you may find that beyond about 40 yards the pattern gets too thin and holey for most general bird work. That’s not a rule carved in stone, but it’s a common reality that shows up on targets when you take the time to check.
Fixed vs. Interchangeable: How to Choose
For collectors and traditionalists, fixed chokes feel like coming home. The constriction is cut into the steel, and the barrels tend to ring and balance the way the maker intended. There’s a simplicity to fixed chokes that appeals to bird hunters who know their cover and typical shot distance. Some shooters also find a fixed-choke barrel feels a hair steadier, with a consistent point of impact and no tubes to loosen. On the other side, modern screw-in chokes give you near-instant adaptability. Swap from Improved Cylinder to Modified at the truck and you’ve tuned the gun to the morning’s birds or station layout.
Summarizing the practical trade-offs, as discussed in places like Shotgun Life: fixed chokes are simple and consistent but lock you into the maker’s choice. If that choice doesn’t match your needs, your options are live with it, have a competent smith alter constriction, or change barrels. Interchangeable tubes bring flexibility and the freedom to test many combinations without permanent changes. For most buyers of modern repeaters and O/Us, screw-in tubes are now the norm and make household sense for one-gun-does-most roles. For the collector eyeing a vintage American double with original bores, fixed chokes are part of the gun’s character and value.
If classic doubles are your thing, you might enjoy a broader look at old American smoothbores in our piece on Parker Brothers shotguns and originality tells. Many Parkers and their peers left the factory with fixed choke combinations set up for the era’s field shooting.
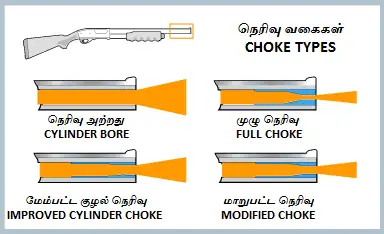
Constriction Names and What They Mean on Target
Manufacturers use familiar names to signal approximate constriction. While dimensions can vary among makers, the practical effect is easy to remember:
- Cylinder throws the widest pattern quickly. Useful very close.
- Improved Cylinder stays open but less so than Cylinder. A go-to for close-flushing birds and decoyed waterfowl.
- Modified tightens up for a longer window of pattern density. Common for pheasant and general-purpose work.
- Full holds the cloud tight for longer shots. Turkey or pass shooting territory with the right load.
- Extra Full or Turkey tubes are specialty tight for a narrow, dense core on a stationary head-and-neck target.
These names are guidelines, not guarantees, because the shell you feed the gun changes the result. Wads, pellet size, velocity, buffering, and shot material all shift how a load responds to a given choke. That’s why patterning matters more than the name etched on the metal.
Loads, Wads, and Why the Shell Matters
The shell you choose is half the pattern story. Different pellets and wad systems behave differently when they meet constriction, and they separate differently once they leave the muzzle. It shows on paper. Notes from field and range experience, echoed by editorial testing, make a few realities clear:
- Pellet size and count matter. Bigger pellets bring fewer strikes for a given payload weight, while small shot ups pellet count and spreads energy across more hits.
- Velocity influences how violently the column is squeezed and how quickly the pattern opens. Faster isn’t automatically tighter or better.
- Wad design changes everything from muzzle exit to how evenly pellets peel away. One-piece shotcup wads that cradle the payload can keep pellets together longer. Other designs peel earlier and spread quicker. The only way to know is to shoot paper.
- Buffered vs. unbuffered loads pattern differently. Buffer material can help keep pellets round longer, which often keeps the core of the pattern tighter.
Two more lessons worth underlining when you start counting holes on butcher paper. First, no two patterns are exactly alike. There is real shot-to-shot variation, so plan to fire a few with each combination. Second, the mythical even pattern simply doesn’t exist. Patterns are denser in the center and sparser at the edges, with clumps and gaps throughout. Choosing the right choke for the range closes some of those gaps where you need the pattern to work.
Forcing Cones in Plain Language
Before the shot charge ever meets the choke, it passes through the transition from chamber to bore. That short tapered section is the forcing cone. It guides the wad and pellets from the wider chamber into the bore diameter. Because it is part of the handoff between shell and barrel, any change in that transition can influence how the payload enters the bore and ultimately how it responds to the choke. Some shooters have their cones lengthened by a gunsmith; others leave them as built. Since there are many variables in play, the only practical way to judge the outcome is, again, to pattern your shotgun with the loads you plan to use.
Safety and Compatibility Notes Buyers Should Check
A few buyer checks save headaches:
- If you’re handling a threaded-barrel shotgun, do not fire it without a choke tube installed. An empty muzzle can damage internal threads and alter patterns for the worse.
- Confirm the tube markings. Many modern tubes are rated for lead, steel, bismuth, and tungsten, but not all are. Look for engravings on the tube body and cross-check with the manual when in doubt.
- Older fixed-choke barrels were built for the ammunition of their day. Some of those barrels and early tubes are not suitable for hard steel shot. If you plan to shoot non-toxic loads through a vintage gun, have a competent smith evaluate it and review the maker’s guidance.
- When buying used, make sure the threads are clean and the tubes seat fully. Ask if the factory set is included. Replacement tubes add cost and not every thread pattern is easy to find.
How to Pattern Your Shotgun Step by Step
This is the part that answers questions and ends arguments. A simple session tells you where the gun prints and how dense the pattern really is at your hunting or target distance. Here is a straightforward plan, adapted from off-season chores many of us do and from practical tips that mirror publications like Ducks Unlimited:
- Set up a safe backstop and a big target. Paper at least 3 feet by 3 feet makes life easier. A roll of butcher paper taped to cardboard works well.
- Pick realistic distances. Forty yards is a traditional benchmark for pattern checks, and it remains useful. Just make sure you also test at the ranges you actually shoot. Turkey may be 30 to 40. Flushing quail might be 20 to 25. Skeet stations are closer still.
- Mark and record. On each target, write the choke, shell brand, pellet size, payload weight, and distance. Label them clearly. You will be surprised what you forget after a dozen shots.
- Use a steady aim point. A small dot or 3-inch sticker is fine. For hunting patterns, aim as you would on game. For point-of-impact checks, use a solid rest.
- Shoot multiple patterns per combo. Fire at least three shots with the same choke and load. Five is even better, as no two patterns are identical. You are looking for a dependable average, not a unicorn.
- Circle and count. Draw a 30-inch circle around the densest portion of the pattern, not necessarily around your point of aim. This reflects the pattern’s true center and helps you judge usable spread.
- Count pellet strikes within the circle and in the core. Note clumps and gaps. If you want to get fussy, open a few shells from the same box and average the pellet count so your percentages are honest.
- Evaluate. Ask if the pattern gives enough even coverage at that range to do the job cleanly, without being so tight you miss slight errors in lead and swing.
For more structured ideas on pattern testing and what to look for, see Ducks Unlimited’s patterning tips. Their reminders about shot-to-shot variation and the reality of clumps and gaps are worth taping to the ammo box.
Reading Patterns and Making Adjustments
Once the paper is pocked with holes, use those dots to guide your next move.
- Core too tight for your distance, with a ragged, thin outer ring? Open the choke one step or try a load with a wad that releases a bit sooner.
- Pattern sparse across the board? Tighten the choke or try smaller shot for more pellet count. Keep an eye on lethality with your game and range in mind.
- Impact high, low, left, or right? That is point of impact, not choke. Adjust your hold, try a different stock fit, or have a smith look at cast and drop. A changed choke rarely moves the center of impact by much.
- Gaps show up consistently in the same quadrant? Try another load. Wad design and pellet hardness can shuffle how the cloud forms.
Remember the lesson about variability. One beautiful target is not proof. The average across a handful of shots tells the truth you can bank on when the dog’s on point or the report pair screams out of the trap house.
Common Patterning Problems and Easy Fixes
A few gremlins turn up so often they are worth calling out.
- Shredded paper at the center with a patchy edge: classic too-tight-for-the-range picture. Open the choke or move a few steps closer in the field.
- Lopsided patterns: check that the choke is correctly tightened and seated. Remove, clean the threads, and reinstall. If it persists, try another tube of the same constriction or a different load.
- Erratic patterns across shots with the same setup: sample a different lot of the same ammo or a different brand. Pellet counts and even measured sizes can vary by lot. Averaging more targets tames the randomness.
- Noticeably thin patterns with steel in a very tight tube: verify your tube’s rating. Some tubes do not play nicely with hard non-toxic shot at extreme constrictions.
Practical Pairings for Common Hunts and Clays
The quick reference most folks want sounds something like this. Use it as a starting point, not gospel, then confirm on paper.
- Quail and grouse in tight cover: Improved Cylinder with light shot.
- Decoyed ducks over water: Improved Cylinder to Modified depending on how close they finish.
- Pass shooting waterfowl: Modified to Full with a load that patterns clean at 40 and beyond.
- Pheasant over big ground: Modified with shot size that carries enough punch. Open to Improved Cylinder for early-season or close dog work.
- Turkey: Full to Extra Full or a dedicated turkey tube with a proven load. Confirm exact range limits on paper before heading to the woods.
- Skeet: Cylinder or Skeet tubes for fast, close crossers.
- Sporting clays: expect to change tubes. Improved Cylinder and Modified cover a lot of stations. Bring a tighter tube for those long chandelles.
These suggestions track with what many makers and instructors share publicly, and they reflect the simple truth that a little constriction goes a long way up close, while tighter tubes pay off as range stretches. Just let your targets tell you the whole story after you shoot a handful of paper.
Care, Maintenance, and a Few Mistakes to Avoid
Threaded tubes need only basic attention to stay safe and consistent. Keep the threads clean, use a light smear of appropriate choke tube grease, and snug them in before each outing. Make it a habit to check tightness at lunch and again before the last walk back to the truck. A slightly loose tube can peel threads, seize, or worse, influence patterns in ways you will not like.
If you run multiple makes of tubes, label them. Different brands use different thread systems and depth. Do not mix patterns. For fixed choke barrels, resist the urge to force modern tricks onto an old gun. Choose loads that work within the barrel’s limits and have a professional evaluate any alterations before metal meets lathe.
Finally, skip the temptation to judge a choke by name alone. Cylinder stamped on one tube rarely mirrors Cylinder from another maker with a different internal profile. Some tubes have long, gentle tapers, others short and abrupt. Let the pellet holes sort the truth.
A Buyer’s Takeaway Worth Repeating
Here is the short version I wish someone had told me early. Chokes shape patterns, not range. A fixed choke can be a joy when it matches your birds and distance, and interchangeable tubes are a gift when your shotgun pulls double duty. Shells matter as much as tubes. Wads, pellets, speed, and buffer material can make a choke feel a step tighter or looser. Forcing cones are part of the handoff from shell to bore and count as one more variable in a system with many moving parts. None of this becomes real until you shoot paper at the ranges you care about and look at an honest average.
Do those things and the gun in your hand, old or new, becomes a clearer instrument. Patterns tighten up where they should, misses make sense again, and that walk behind the dog gets a little more rewarding.