I still remember a scratched-up Japanese bolt gun on a wobbly gun show table, tagged “last-ditch 99” in faded marker. The stock looked like driftwood, the metal wore a flat gray film, and the price seemed tuned to the word “rare” that gets thrown around too easily. Ten minutes later, with the bolt out and the receiver tilted toward the light, the story changed. It wasn’t a thrown-together end-of-war rifle at all. It was an earlier pattern that had survived a hard life and a few missing parts. The difference between a deal and a mistake came down to reading a few square inches of steel and wood the right way.
Arisaka collecting rewards quiet patience. The marks tell you who made it, roughly when it was made, and how much wartime pressure was on the factory that day. The features tell you the rest. Let’s walk through the key pieces, with a buyer’s eye and a collector’s curiosity.
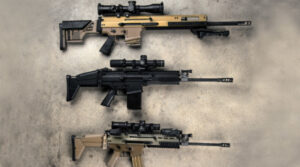
Type 38 vs Type 99 at a Glance
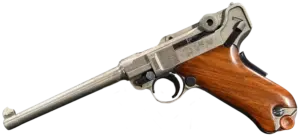
Two names, two eras, both carrying the Arisaka line forward. The Type 38 traces to the 38th year of Emperor Meiji’s reign, 1905. The Type 99 came along much later, adopted in Japanese calendar year 2599, which corresponds to 1939. You’ll see both patterns on tables and in safes, and both share some family traits.
Across the Arisaka family you’ll encounter a two-piece buttstock, a bolt handle with a plum or egg-shaped feel, and a chrysanthemum crest on the receiver ring. That 16-petal mum was the Imperial symbol and it matters to collectors, as we’ll cover below. The rest of the story splits by model and by period.
A quick Type 99 quirk worth learning early: there were two lengths. The standard short rifle most of us picture is around 44 inches. A much scarcer long rifle was made early on, basically mirroring the Type 38’s length. It’s about 50 inches, wears a short pattern handguard, and is associated with specific series from Nagoya and Toyo Kogyo. Production of the Type 99 Long was brief compared to the short rifle, with roughly 38,000 made in total. If you see one, you’re looking at a sliver of the program.
Where to Read the Story: Series Marks and Arsenals
On the left side of the receiver you’ll find the core of your identification: a series symbol, the serial number, and the arsenal mark. Japan numbered rifles in blocks called series. Each series was a group of 100,000 rifles numbered from 0 to 99,999. A small Japanese kana character inside a circle sits just to the left of the serial number and identifies the series. Specific kanas were assigned to specific factories for specific rifle types, and different factories were building the same type at the same time. That’s why series numbers across arsenals don’t line up neatly with “early” and “late.”
A few examples show how this plays out:
- Nagoya made the Type 99 Long in a “Zero” series. Nagoya also made the standard short Type 99 in series marked Zero through 12, spanning much of the war.
- Kokura’s series 20 rifles are still early-war pattern despite the high-seeming number.
- Toyo Kogyo’s series 35 appears in two different contexts. It was used for the Type 99 Long early, and later that same series number shows up on short rifles with simplified, late-war features.
The point is simple: don’t assume series 1 is early and series 30 is late. They are not sequential across all arsenals. If you want to pin down a rifle’s spot in the evolution, compare the series and arsenal together, then check the features you can see. For a handy explainer on the long versus short rifle and how series were allocated, the guide at Type 99 Basics is worth bookmarking.
Early, Mid, and Late-War: What Changed on the Type 99
The Type 99 is famous for visibly evolving as wartime demands tightened. If you learn the signposts, you can stand at a show table and place most rifles in a band of production without a reference book in hand.
Early production
Early rifles tend to have thoughtful finishing touches. The rear sight is a tangent ladder, often with the fold-out anti-aircraft lead wings intact. Those wings, when present and complete, help mark a pre-simplified rifle. Many early rifles also sport a monopod on the front band and a smoothly operating dust cover on the bolt. Metalwork and bluing are generally even, inspection marks are crisp, and small parts like the safety knob are knurled and easy to grasp. The bolt handle looks and feels like a forged, integral piece with a round knob and graceful lines.
Mid-war production 1942–1943
Quality remains good but simplification begins to creep in. The dust cover is one of the first features to vanish from many rifles, with some mid-war guns never issued with one at all. Anti-aircraft wings can still be there, though you’ll see simpler construction or missing parts. The monopod usually remains. Bluing and wood finishing start to vary by arsenal and run. Chrome-lined bores are still the norm, which matters when you check the bore later.
Late-war production
As the war ground on, the features narrowed. Dust covers are generally gone and so are the little extras. Some late rifles lose the anti-aircraft wings entirely, and sights can be simplified. Chrome lining in the bore is not guaranteed at this point. You’ll see rougher stocks, more variance in finish, and on some guns you may spot parts that look welded or quickly machined compared to the earlier forged look. Even then, watch for exceptions – factories used what they had, and transitional rifles exist.
One quick tip when a dust cover is missing: tilt the receiver and look for the machined grooves in the receiver rails. If those grooves are there, the rifle was cut to accept a cover and likely sits earlier on the timeline than a rifle with plain rails.
Chrome-Lined Bores and the Bore Check That Saves Regret
Open the bolt and look down the bore. On Type 99s, chrome-lined bores were common early and through mid-war. Many of those barrels surprise people – decades later they still show clear lands and a bright surface. Late-war barrels that went without chrome lining, especially if stored in humidity, can show darkening or pitting. Pacific island bring-backs suffered rough storage, and chrome did real work when it was there.
Learn to separate a dark but smooth bore from a corroded one. A bore that looks gray but feels smooth to a tight patch can still shoot acceptably. Frosting or scattered pinpricks near the chamber might not hurt you much on the range. Pitting near the muzzle is a bigger problem for accuracy. A quick trick at the table is to shine a light at the breech, then look from the muzzle to see how sharp the lands look at the crown. Don’t be shy about asking to run a patch if the seller is willing.
Monopods, Dust Covers, and the Tell of Mixed Parts
Monopods and dust covers are collectible, and that attracts parts swapping. Early and mid-war Type 99s that kept their original pod and cover have a certain harmony to them. The front band with the pod looks like it belongs on the rifle, and the finish across the band, screws, and stock tells the same story. If the band or pod looks immaculate on a stock that screams late-war, be cautious.
Don’t forget the dust cover groove check on the receiver rails. Even if the cover itself wandered off years ago, the grooves help identify earlier machining and save you from assuming a rifle is late. On the bolt, look at the safety knob – knurled and neatly made usually points to earlier production. The bolt handle on earlier rifles tends to be a clean, integral piece with a round knob. If something looks welded or abruptly shaped, that usually suggests later manufacture – though again, transitional runouts can mix features.
The Mum: Intact, Struck, Ground, and the Concentric Circles
That 16-petal chrysanthemum on the receiver ring still sparks debate across show aisles. Many rifles arrived with the mum defaced. Some were marred or ground off by Japanese soldiers anticipating capture, others defaced after the war by edict. In both cases the idea was the same – preserve the honor tied to the Imperial symbol. Collectors note the state of the mum because it speaks to how the rifle left service and, frankly, because it looks striking when intact.
There’s another marking you’ll occasionally see in place of a mum – two concentric circles on the receiver. Their purpose isn’t fully known. It has been suggested they were used on rifles issued to paramilitary elements like military police or guards for non-combat installations. Some concentric circle rifles were regular guns that had the mum removed and replaced with the circles, and those were serialized in their own way. Other rifles appear to have been made new with the circles from the start. If you come across one, treat it as a variant with its own trail to research rather than assuming anything about frontline service. For a wider overview of Japanese markings and these special cases, see the summary at Markings on Japanese Arisaka Rifles and Bayonets.
One myth to park right now: an intact mum by itself does not prove a “battlefield pickup.” There are many paths a rifle could have taken to reach a shelf with its crest untouched. Modern research has untangled a lot of old show-table lore, and it pays to be skeptical of easy stories.
Stocks, Handguards, and Finishing Clues
Japanese service rifles make their own kind of sense when you handle the wood. The two-piece buttstock is a signature trait across Arisakas. On earlier Type 99s, the stock fit and finish are pretty refined for a nation at war – neatly inletted bands, even sanding, and inspection marks that look stamped rather than scuffed in.
As production moved into the middle of the war, you’ll feel the shortcuts. Wood can show less final sanding, edges get sharper, and small dings that would have been dressed earlier are simply sealed over. That does not make a rifle inferior as a historical object – it just tells you when the stock was born.
Handguards help with identification too. The Type 99 Long uses a short handguard on a long barrel and stock – a tell that you can spot across a crowded rack. The standard short Type 99 wears a handguard proportional to its roughly 44-inch length. The Type 38, being an earlier long rifle, shares the long overall length with the 99 Long, which is why early planners aimed to have the two types side by side at first.
Bayonets: Pairing Notes Without the Rabbit Hole
Bayonets attached to Arisakas can fascinate all on their own. This is a field with its own books and checklists. If you’re pairing a bayonet to a rifle for display, make sure the lug interface is sound and the locking mechanism engages positively. Since markings on Japanese bayonets vary widely by maker and period, a markings reference is your friend. The general Japanese markings overview linked above is a solid place to start your comparison.
Import Marks and “Bring-Back” Lore
On the U.S. market you’ll encounter rifles with small, later-applied importer stamps. These are usually unobtrusive lines of text naming a company and location, often found on the barrel or receiver. They are not wartime markings. Some collectors prefer rifles without them for display purity, while others simply note them as part of the rifle’s postwar path. What matters most is being able to separate original military marks from anything added decades later.
If you enjoy surplus history comparisons, the approach to markings and originality echoes what matters when examining carbines like the SKS – factory marks, production changes, and postwar additions each tell a chapter. I’ve covered that mindset in our SKS collector guide, and the same slow, careful reading applies here.
What to Inspect: A Practical Walkthrough at the Table
Here’s how I handle a Type 38 or Type 99 when a seller nods and says “go ahead.” You can do most of this in two or three minutes if you have good light.
- Receiver left side: Find the series kana in a circle, the serial, and the arsenal mark. Note the series and the factory together – that pairing sets your expectations for features.
- Overall length and handguard: If it’s a Type 99 and measures around 50 inches with a short handguard, you might be holding a Type 99 Long. The standard Type 99 short rifle runs about 44 inches. The Type 38 shares long-rifle proportions with the 99 Long.
- Rear sight: Look for the tangent ladder and check for fold-out anti-aircraft wings. Complete wings point to earlier production. A simplified or fixed rear sight suggests later output.
- Monopod and front band: If a monopod is present, study finish and fit. Does the pod’s wear and patina match the band and stock, or does it look like a fresh transplant?
- Dust cover provisions: Even if the cover is gone, check the receiver rails for cover grooves. Grooves usually mean earlier machining.
- Bolt details: Is the safety knob knurled and cleanly made? Does the bolt handle look like an integral forging with a round knob, or does it show abrupt contours that feel later? Work the safety – it should move positively.
- Chrysanthemum: Note whether the mum is intact, struck, or ground. If you see two concentric circles in its place, flag the rifle for deeper research as a special-marking example.
- Bore check: Open the bolt and shine a light. On Type 99s, a bright chrome-lined bore is common on earlier and mid-war guns. Late rifles can be unlined and may be darker. Distinguish smooth dark from pitted, and pay special attention to the muzzle’s edge.
- Stock and handguard condition: The Arisaka’s two-piece buttstock is normal – don’t let that joint scare you. Look for cracks around the wrist and barrel band areas. Compare the wood’s level of finish to the period you think you’re seeing.
- Later markings: Scan for small, modern text from importers. Make a mental note of location and style so you don’t confuse it with arsenal markings.
If the rifle passes those checks and the features line up with the series and arsenal you wrote down, you’re in a good place to start talking price. If the story doesn’t match – late-war features on a series associated with early production, or an immaculate monopod on a rough late stock – slow down. Mixed features happen, but they should make sense together.
Before you go, remember that the Type 99’s early profile can be especially attractive to collectors: tangent rear sight with anti-aircraft wings, chrome bore, monopod, and often a dust cover. These complete packages are out there, but you’ll also see a lot of rifles with one or two of those pieces missing – perfectly valid and still full of history. A helpful overview of early patterns and last-ditch simplifications worth comparing to your notes can be found in the buyer-focused write-up at MyGunDeal’s Type 99 guide.
The best part of learning these rifles is that every table becomes a chance to read another chapter. The series and arsenal marks put the rifle on the map. The features tell you what the factory could afford to do that month. The mum reminds you the rifle served a different flag. And the bore, simple as it is, decides if it still has a voice at the range. Take your time. Let the details talk.