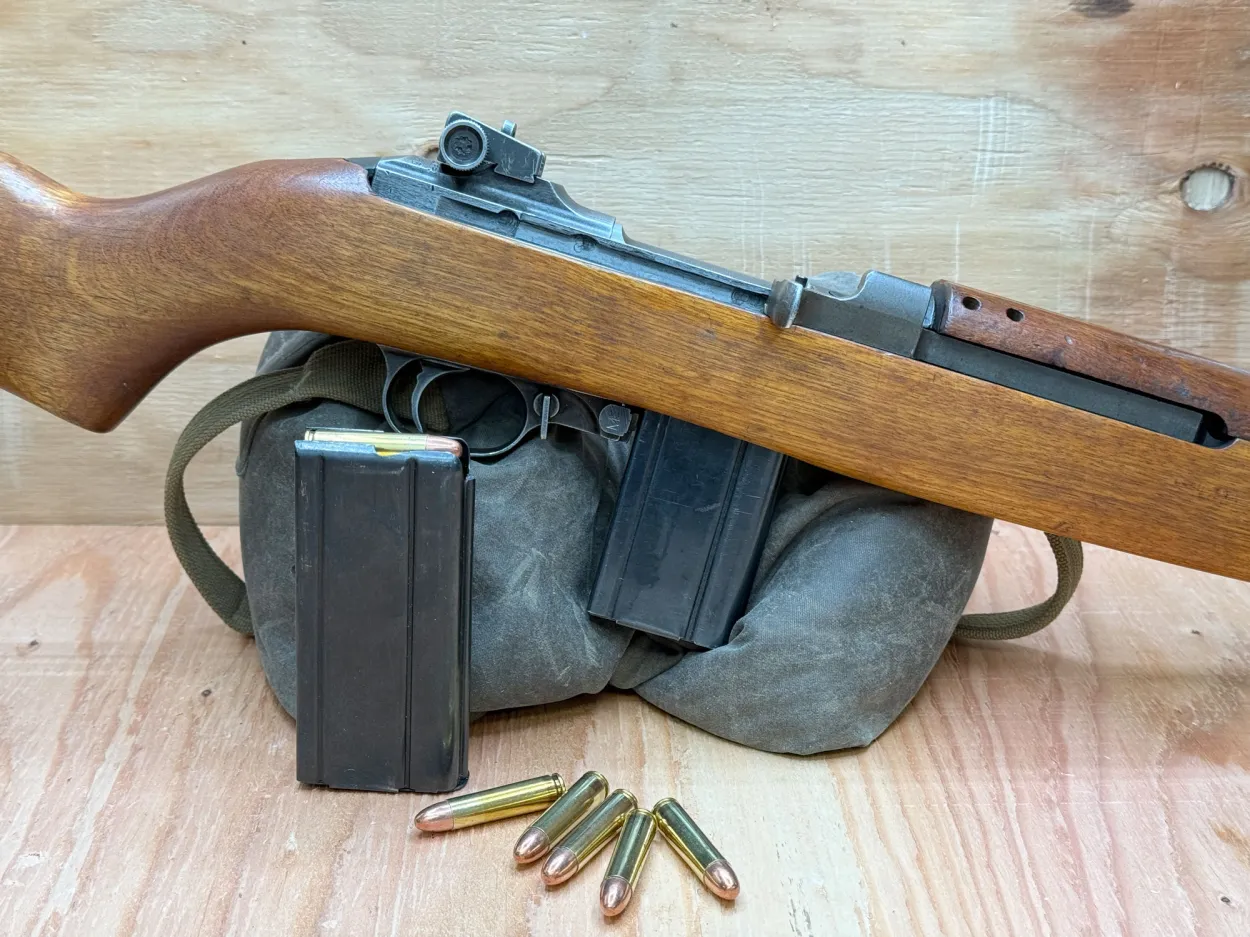
I still remember the first M1 Carbine that really made me pause. It had the look. Walnut with honest miles, an even, earned finish, and a rear sight you could click. Then I caught the bayonet lug and felt that tug we all know when details do not line up with the story. That rifle sent me down the path of parts types, rebuild clues, and how to tell a faithful survivor from a carbine that is rebuilt, repaired, or newly assembled. If you are staring at one on a table or in an online listing, this guide helps you read what you are seeing.
What collectors mean by a mixmaster
A mixmaster is a carbine assembled from parts that were not together when it left a wartime contractor. Sometimes that happened in government depots during postwar overhauls. Sometimes it happened on a bench last summer. Many shoot beautifully. It only matters if you are paying for originality. Know the timeline of parts so you can sort honest arsenal work from questionable assemblies.
Wartime makers: the ten contractors and quick tells
The M1 Carbine was built in huge numbers by a network of contractors. Collectors generally agree on ten main wartime manufacturers. Springfield Armory did not produce WWII carbines, despite receiving tooling and parts late in the war.
- Inland Manufacturing Division (GM)
- Winchester
- Underwood Elliott-Fisher
- Quality Hardware & Machine (Quality H.M.C.)
- National Postal Meter
- IBM
- Saginaw Steering Gear S.G. (Saginaw)
- Saginaw Steering Gear S’G’ (Grand Rapids, took over Irwin-Pedersen receivers)
- Standard Products
- Rock-Ola
Quick tells and codes to get you oriented:
- The receiver heel is maker-marked. That is your starting point for the rifle’s as-built identity.
- Barrels are often rollmarked near the muzzle with a maker name, for example, Underwood, IBM, or Rock-Ola. Do not panic if the barrel maker differs from the receiver. Parts flowed.
- Stocks and handguards carry subcontractor or maker codes in the slingwell or underside, for example IO, RMC, HI, SG. These are clues, not verdicts.
- Small parts have letter codes that often trace to contractors. Interchange was the rule, especially after rebuilds.
Expect patterns, not perfection. With so many factories feeding the pipeline, mixed but correct USGI parts are common.
USGI vs commercial: quick eliminators before you get granular
First, confirm you are looking at a USGI carbine. Postwar commercial buildings show up often. Two common names are Universal of Hialeah and Iver Johnson. Universals, in particular, often wear a ventilated metal handguard and use a modified bolt that does not mirror GI contours. Those are collector lane changes.
For a solid overview of wartime versus postwar features, see RJ Militaria’s M1 Carbine collector guide and this concise WW2 M1 Carbine markings overview.
Rear sights: flip vs adjustable, why photos seldom show adjustables, and staking tells
Rear sights are fast timeline clues. Early and mid-war rifles used a simple flip sight. The fully adjustable rear sight that many shooters prefer is rarely seen in true wartime photos. That is because most adjustables were installed after 1945 during arsenal upgrades.
Check the staking around the rear sight dovetail. Original installations show neat, aged stake marks. Fresh peening or disturbed metal suggests a later change. An adjustable sight on an otherwise early carbine is usually a rebuild hint, not a red flag by itself.
Barrel bands: Type 1, Type 2, Type 3, and what they suggest
The barrel band tells a lot of your carbine’s story at a glance.
Type 1
Narrow band retained by a spring. This is the band on most wartime carbines and primarily serves to stabilize the handguard.
Type 2
A wider band is seen on some late-war rifles, roughly mid 1944 onward. Better control, not as common as Type 1.
Type 3
Type 2 pattern with a bayonet lug. Introduced in 1945. Very common today because many rifles were upgraded post-1945.
Match the band to the rest of the package. Early stock and flip sight with a Type 3 band suggests a rebuild. Late features across the board tell a different, equally honest story.
Stocks by type: high wood vs low wood, I-cut vs oval oiler, pot-belly implications
- Type 1 stock: early. High wood with an I-cut oiler recess.
- Type 2 stock: mid-war. High wood with an oval oiler recess.
- Type 3 stock: late. Low wood with an oval oiler recess.
High wood describes the taller ridge of wood guarding the operating handle. It proved fragile, so most makers shifted to low wood in early 1944. You will also encounter the pot belly stock, a fuller-belly pattern associated with the M2. Many M1S received pot belly stocks during government overhauls.
Quick feature date cues: a pocket checklist
- Flip rear sight: early to mid-war. Adjustable rear sight: mostly post-1945 upgrades.
- Type 1 band: common throughout most of WWII. Type 2: mid-1944 to late war. Type 3 with bayonet lug: introduced in 1945, widely seen due to postwar upgrades.
- High wood stock: early to mid-war. Low wood: most makers by early 1944.
- Pot belly stock: typical of rebuild era or M2 conversions; often seen on overhauled M1S.
Use these as cues, not certainties. Parts were updated and swapped during service and rebuilds.
Arsenal rebuilds: what changed and how to read the pattern
Most GI carbines did not stay as-built. They served, then returned for upgrades. Two common changes define what you see today:
- Flip sights replaced with adjustable sights.
- Barrel bands updated to Type 3 with bayonet lug.
Stocks were swapped as needed. Pot belly stocks were installed on many M1S during overhauls. An early receiver wearing a late sight and Type 3 band is normal for a postwar rebuild and has its own collecting lane.
Stock cartouches and rebuild stamps: concrete examples collectors expect
Cartouches are stamped markings in the wood. Treat them as clues within the larger picture of parts, finish, and wear.
- Original acceptance: commonly a crossed-cannons Ordnance cartouche on the right butt. Age and finish should match the stock.
- Slingwell and handguard codes: typical maker or subcontractor codes include IO, RMC, HI, SG. These help align a stock to a maker but do not guarantee it is original to your receiver.
- Arsenal rebuild stamps: examples you will see include RIA/EB, AA or AN, SA, OG, BA/JA, ANAD, MR. These signal depot works include sight and band upgrades or stock replacements.
- Sight staking as a clue: crisp, bright stake marks around the rear sight dovetail suggest a recent change. Even-aged peening usually reads as older work.
Be wary of scrubbed finishes or flattened wood around a stamp. Authentic cartouches age with the stock rather than float on top of sanded wood.
How to spot a mixmaster in the wild
- Rear sight: flip vs adjustable, and does the staking look fresh?
- Band vs stock: Type 1 with high wood and a flip sight fits early. Type 3 with low wood and adjustable sight reads late or rebuilt. A Type 3 on high wood is a timeline flag to explore, not an automatic fail.
- Commercial tells: ventilated metal handguard or non-GI bolt geometry often equals Universal or other commercial builds.
- Finish coherence: consistent age and tone across parts is reassuring. One brand-new part on a gray, worn receiver invites questions.
- Stock shape: pot belly stocks usually push a rifle into the rebuild column.
- Maker marks: receiver, barrel, and stock codes rarely match across the board. Focus on whether the features agree in time, not on forcing a single maker everywhere.
Buying with clear goals
- Shooter: a postwar rebuild with an adjustable sight and a Type 3 band is a smart, honest choice.
- Representative GI: seek a coherent period look, for example, high wood, Type 1 band, flip sight, while accepting some updated parts.
- As-issued vibe: hardest to find. Pay attention to coherence, and document parts and marks clearly.
A brief note for shooters
If you plan to fire your carbine, have a competent armorer check headspace and basic function. These are surplus rifles with long service lives. A quick safety check is cheap insurance.
Putting it all together and sources
At the table, run a simple script: overall impression, rear sight and staking, band type, stock type and shape, cartouches and rebuild stamps, then coherence. Only after that, start chasing small-part codes.
For further reading and photo references, see RJ Militaria’s M1 Carbine collector guide, Canfield’s collector guide, and this WW2 M1 Carbine markings overview.
The beauty of the M1 Carbine hobby is that it rewards careful eyes and calm decisions. The rifle on the table that looks right until it does is not a trap. It is an invitation to read the story written into its parts.